There are two types of contacts:
- Lender Contacts
- Company Contacts
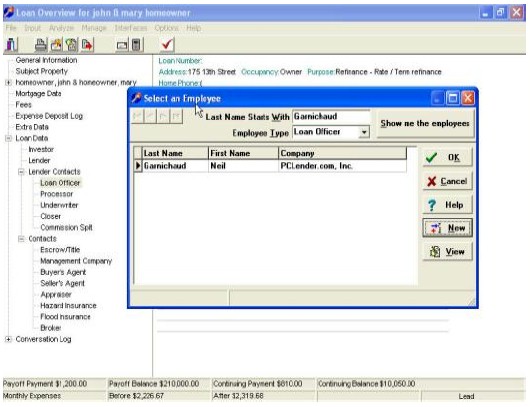
Lender contacts are associated with Loan Officer, Processor, Underwriter, Closer, and Commission Split. To associate a contact with a loan, open the loan, and from the Loan Overview double-click one of the blank Lender Contacts. The Select Employee screen is displayed as seen below.
To enter a New contact click on the New Button and a new screen will appear.
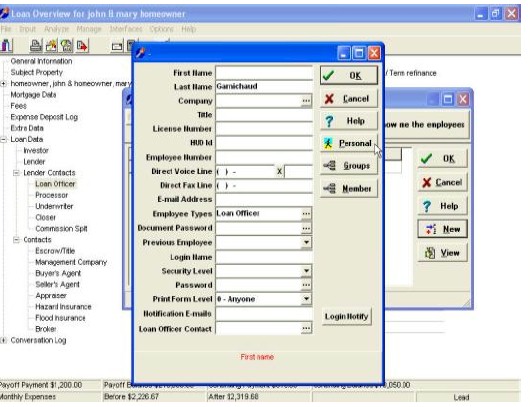
The screen contains general contact and employer information, and the Personal button opens a
sub-screen that captures personal, non-work related information about the contact.
This screen can be used for external contacts who have no access to IHM or for internal personnel who use IHM daily. The screen will be entitled the Employee Information screen for those with access to IHM, and is used to define the security settings for the user. The Employee Type field is used in searches that query by employee type. The Security Level field opens the Security Level screen seen below and is used to define the employee’s level of access.
The Groups button allows your IHM administrator to select specific origination groups so that the employee can only view loans belonging to those selected groups. The Member button allows the user to be designated as a member of one or more groups. The Login Notify button allows a supervisor or administrator to specify an email address to be notified whenever the user logs in to IHM. The Notification Emails field allows the user to be notified of new loans via multiple email addresses other than the email address specified in the Email Address field. For example, a user may want to receive email notification on a cell phone or at a home email address; those addresses would be specified in this field.
Company Contact Information Screen
Contact Options
To associate a contact with a loan, open the loan, and from the Loan Overview double-click one of the blank Contacts. The Contact Options screen is displayed as seen below.
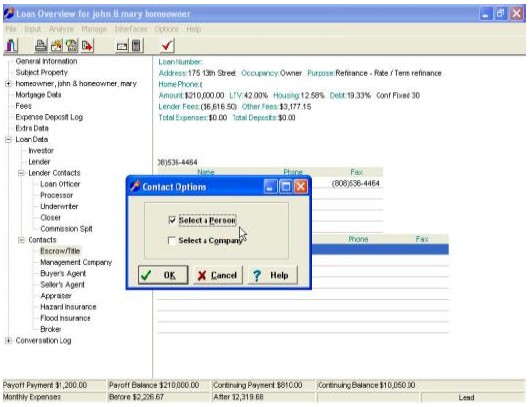
If you are associating a person with the loan, check the “Select a Person” check box.
- If you are associating a company with the loan, check the “Select a Company” check box.
typing Alt+P or Alt+O, etc.), but the easiest way is to use the Space bar. Pressing the Space bar toggles the selection, meaning that if Select a Person is checked, pressing the Space bar checks Select a Company and vice versa.
- Once you have made the appropriate contact option selection, click the OK button Selecting a Person Contact
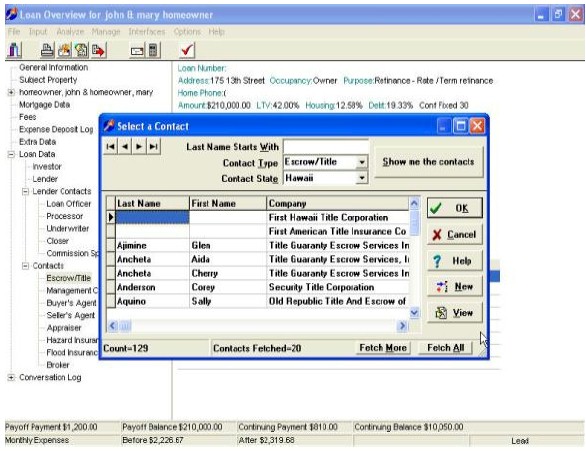
1. In the contact search screen, type the first few characters of the last name of the person you are trying to associate with this loan.
- Note that the Contact Type filter is preset to the type of contact you double-clicked on in the Loan Overview but you can override it if necessary.
- Also note that the Contact State filter is preset to the subject property state. This assumes you will be selecting, for example, an appraiser based in the same state as the subject property. Youcan override the Contact State filter with another state or with the “All” selection.
- Use the common searching techniques to find the appropriate contact. Use the Fetch More or Fetch All buttons (if available) to display more contacts that match the search parameters.
Once you have found the appropriate contact, select that contact and click the OK button. To view or edit more information about the contact (such as the contact’s address and phone number), click the View button.
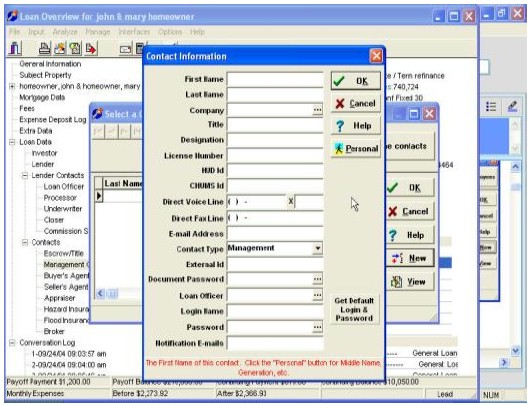
- If the contact you are trying to associate with the loan cannot be found, click the New button to display the Contact Information screen as shown below.
Select New
Selecting a Company Contact
If you choose the Select a Company option on the Contact Options screen, the Select a Company screen is displayed as seen below. Also, if from the Loan Overview you double-click a non-blank contact that already has a company association, the same screen is displayed.

Type the first few characters of the last name of the company you are trying to associate with this loan. Note that the Company Type filter is preset to the type of company you double-clicked on in the Loan Overview, but you can override it if necessary.
Also note that the Company State filter is preset to the subject property state. This assumes you will be selecting, for example, an appraisal company based in the same state as the subject property. You can override the Company State filter with another state or with the “All” selection.
Selecting the Show me the companies button displays the list of companies that match the search parameters specified using the three filters at the top of the screen.
Use the common searching techniques to find the appropriate company. Use the Fetch More or Fetch All button (if available) to display more companies that match the search parameters. Once you have found the appropriate company, select that company, and click the OK button. To view or edit more information about the company (such as the company's address and phone number), click the View button.
If the company you are trying to associate with the loan cannot be found, click the New button to display
the Company Information screen as shown below.
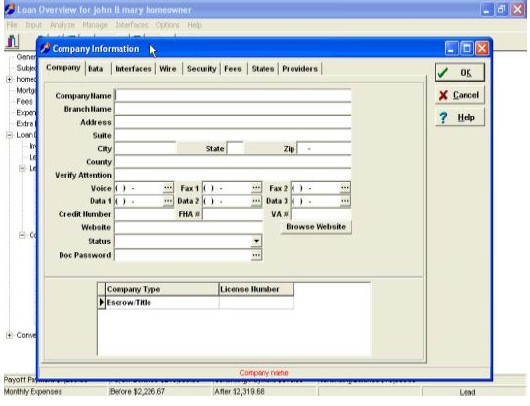
The Company Information screen is important because it integrates with several functions of the program. Once entered, company information remains in the database to be used repeatedly in numerous loans. For that reason, it is important to understand the screen and be sure that information is entered correctly. There are several different tabs in the Company Information screen, the number of which is determined by the company type. Some company types may only have two tabs, while others may have up to nine tabs.
1. The Company tab, the first tab containing the visible information when the Company Information screen is opened, contains the general business information regarding the company. At the bottom of this tab is the Company Type list. The initial company type will default based on the purpose of the company addition. For example, when adding a new employer the company type will default to VOE.
2. The Data tab contains information pertinent to lenders and investors for populating loan forms.
3. The Interfaces tab contains information regarding company identification for interfaces and HMDA reporting.
4. The Wire tab is used to gather the wiring instruction information to be used for any electronic interfaces.
5. The security tab identifies the level of security required to make changes to the company and to log information about when the data was last reviewed.
6. The Fees tab collects fee information relevant to the company such as any wire or delivery fees they charge.
7. The States tab specifies the states in which the company lends.
8. The Providers tab is used to populate the Attachment to the Good Faith Estimate. The information is formulated in code and should only be altered by the system administrator or another trained user.
9. The Lender tab is only available for lenders and is used to enter lender specific default data for all new loans opened in the Lender’s name.
Fill in the appropriate information, and click the OK button. Note that the Last Name and Company Type fields are preset with the information from the previous screen’s search parameters.
Deleting an Existing Contact
To delete an existing contact, select the contact on the Loan Overview and on your keyboard press the Ctrl and Delete keys simultaneously. Alternatively, you can right-click the contact and select Delete from the pop-up menu. Either way the system asks you to confirm the deletion and then removes the contact association from the loan.
Changing the Contact Option for an Existing Contact
When you double-click a non-blank contact, the Contact Options screen is skipped and either the Select a Contact or Select a Company screen is displayed. If you wish to switch a contact type (i.e. switch from a company contact to a person contact or vice versa) you must first delete the existing contact.
If a loan is to be funded as a closed or table funded loan, the Lender field is used to populate print forms as the lending company. Selecting the Lender field will open the Lender Information screen, where many data fields are found for disclosure and closing document preparation.
Additionally, fields located in the Lender Information screen are used to populate many of the print forms and are used for communication with other vendors. This is where the mortgagee clause is found for insurance binder preparation.
For brokered out loans, the lender is used as the originating company (the IHM customer - your company), and the wholesale lender who is funding the loan should be identified in the Investor field.
The Investor field is used to identify who will be funding the loan for brokered-out loans and who will be purchasing the loan for closed loans (if applicable).
- Fill in the appropriate information, and click the OK button. Note that the Last Name and Contact Type fields are preset with the information from the previous screen’s search parameters.
